What is Metadata Ingestion?
Metadata Ingestion is the process by which Model-Prime consumes and extracts data from your robologs.
If your organization stores its robologs in Google Drive, you may skip this section and proceed to Automating Ingestion for Google Drive. Otherwise, if your company uses AWS S3, please continue reading.
Metadata Ingestion setup for customers using AWS
In order for Model-Prime to process your robologs you must grant read access to the S3 bucket that will store them unless you plan on making it publicly readable. The process of creating an S3 bucket, granting the appropriate read permissions, and (optionally) registering it with Model-Prime so that we automatically ingest any newly uploaded robolog is fairly simple.
This guide requires no prerequisite S3 knowledge. If you already know how to configure AWS, or do so using cloudformation/terraform/AWS CLI, you may skip to the Grant Model-Prime Permission to the Bucket section, which will provide you with the IAM information to use with your existing workflow. Otherwise, this section will follow and extend the steps from the official AWS guide on this subject in order to serve you.
Step 1. Create a bucket
If you already have a bucket which contains your log data, simply take note of the region it is in, then feel free to skip this step.
Create an S3 bucket in which you intend to store the robologs to be ingested by Model-Prime. You may do so by following the official S3 bucket creation user guide. It is best to not modify the default configuration of this newly created bucket so as to ensure that your sensitive information is NOT made accessible to the public. As an additional security formality, we advise that any S3 bucket shared with us should ONLY contain files or objects which you and your company are willing to share with Model-Prime.
When you've created your bucket, take note of which region it is in. Our services are primarily located in the
us-east-1 region, so creating your bucket there may have less overhead, but we are able to ingest from any AWS region
which has support for both S3 and Lambda.
Step 2. Grant Model-Prime permission to the bucket
Model-Prime only needs the s3:GetObject permission on your bucket since we will not be adding or modifying any objects
within it. This permission may be granted within the bucket's Permissions tab as shown below.
In order to provide you with a thorough example, we have created a bucket named modelprime.example.bucket and will run
through the process of granting it the necessary permissions for ingestion.

Once in this tab, scroll down to the bucket policy widget and press Edit.
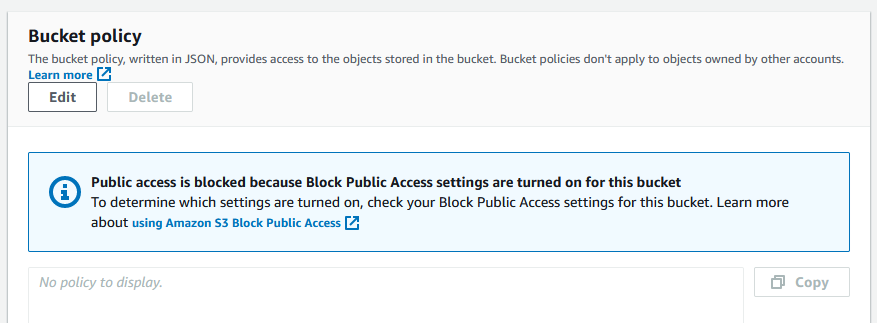
Once editing, add a policy similar to the following:
{
  "Version": "2012-10-17",
  "Statement": [
    {
      "Effect": "Allow",
      "Principal": {
        "AWS": "arn:aws:iam::<provided-Model-Prime-account-number>:role/ingest"
      },
      "Action": ["s3:GetObject"],
      "Resource": ["arn:aws:s3:::modelprime.example.bucket/*"]
    }
  ]
}
Take note that we have set an Allow for Model-Prime's ingest role to perform the s3:GetObject action on the example bucket. You must use the same Principal value as shown above. The Resource value should refer to your bucket ARN which may be conveniently copied from the AWS web console.
Encrypted buckets
If you've elected to encrypt your bucket, you will need to grant Model-Prime's IAM ingest role permission to use the bucket's KMS key. Official instructions on creating a cross-account KMS key before associating it with your bucket may be found here.
Following the official cross-account key creation instructions will result in a policy that provides access to Model-Prime's root account. You will need to edit the key policy using the editor provided during the key creation Review step, or after creating the key, by changing all references of <provided-Model-Prime-account-number>:root to <provided-Model-Prime-account-number>:role/ingest.
If you've already created the key, follow these steps to edit the key policy:
- Go to the AWS Key Management Service dashboard
- Select
Customer managed keys - Click on the key alias for the key associated with your ingest bucket
- Scroll down to the
Key policysection and click theEditbutton - Ensure that the following policy statements are included:
{
  "Sid": "Allow use of the key",
  "Effect": "Allow",
  "Principal": {
    "AWS": "arn:aws:iam::<provided-Model-Prime-account-number>:role/ingest"
  },
  "Action": [
    "kms:Encrypt",
    "kms:Decrypt",
    "kms:ReEncrypt*",
    "kms:GenerateDataKey*",
    "kms:DescribeKey"
  ],
  "Resource": "*"
}
{
  "Sid": "Allow attachment of persistent resources",
  "Effect": "Allow",
  "Principal": {
    "AWS": "arn:aws:iam::<provided-Model-Prime-account-number>:role/ingest"
  },
  "Action": ["kms:CreateGrant", "kms:ListGrants", "kms:RevokeGrant"],
  "Resource": "*",
  "Condition": {
    "Bool": {
      "kms:GrantIsForAWSResource": "true"
    }
  }
}
Next steps
Model-Prime will now have the ability to read objects from your bucket, but will not have the ability to obtain a list of objects that exist in the bucket. In order to receive information about what exists in the bucket, ingestion must be triggered. Proceed to the next section to learn more about the options available for triggering ingest.