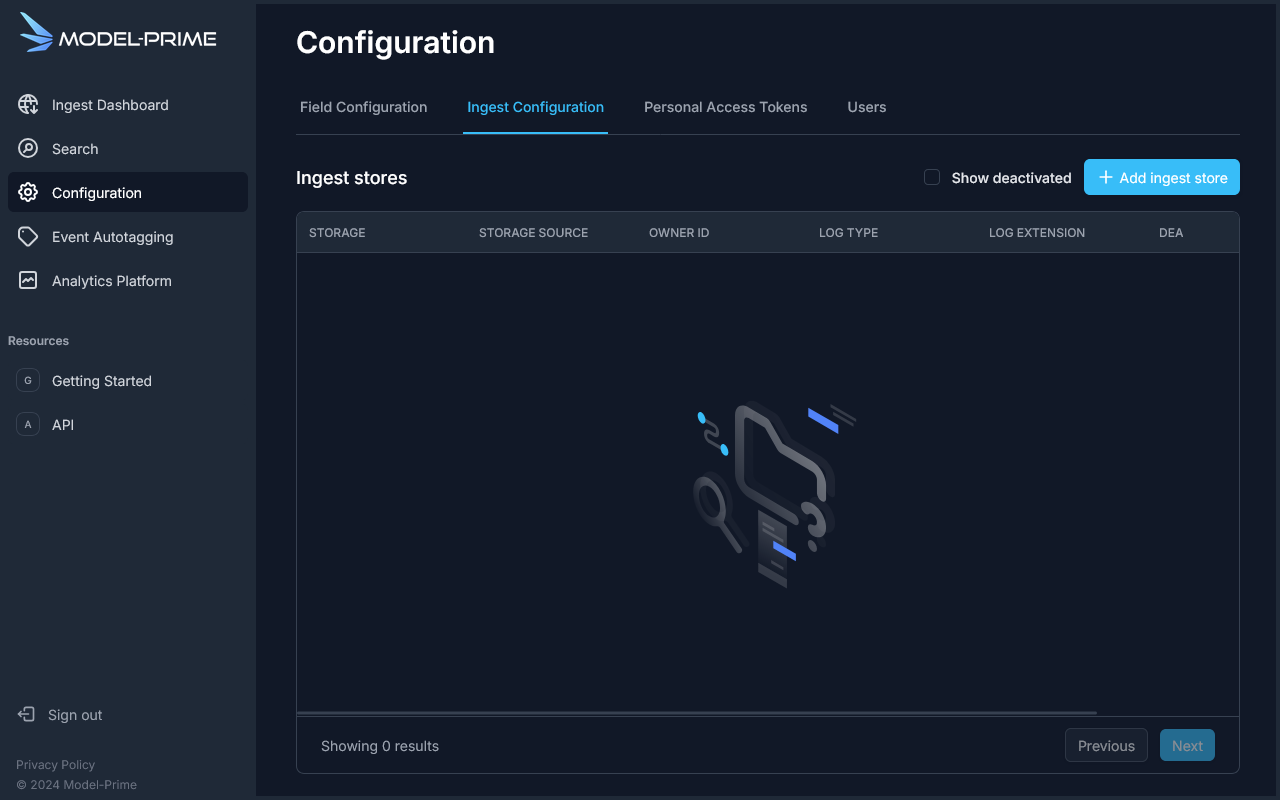
Automating ingestion for GCS
Automating ingestion allows you to optimize your workflow with Model-Prime. We assume that all data placed in your data store is intended to be shared with us, and we will therefore ingest metadata for any new file added to it. The configuration outlined below also allows us to continually validate your data store settings in order to alert you if we ever unexpectedly lose access.
Step 1: Register your data store
In order to let Model-Prime handle ingestion events automatically, the data store containing robologs that you want ingested must be registered with us. An easy way to manage your registered data stores is from our web UI.
Click on the Add ingest store button & select the Google Cloud Storage tab.
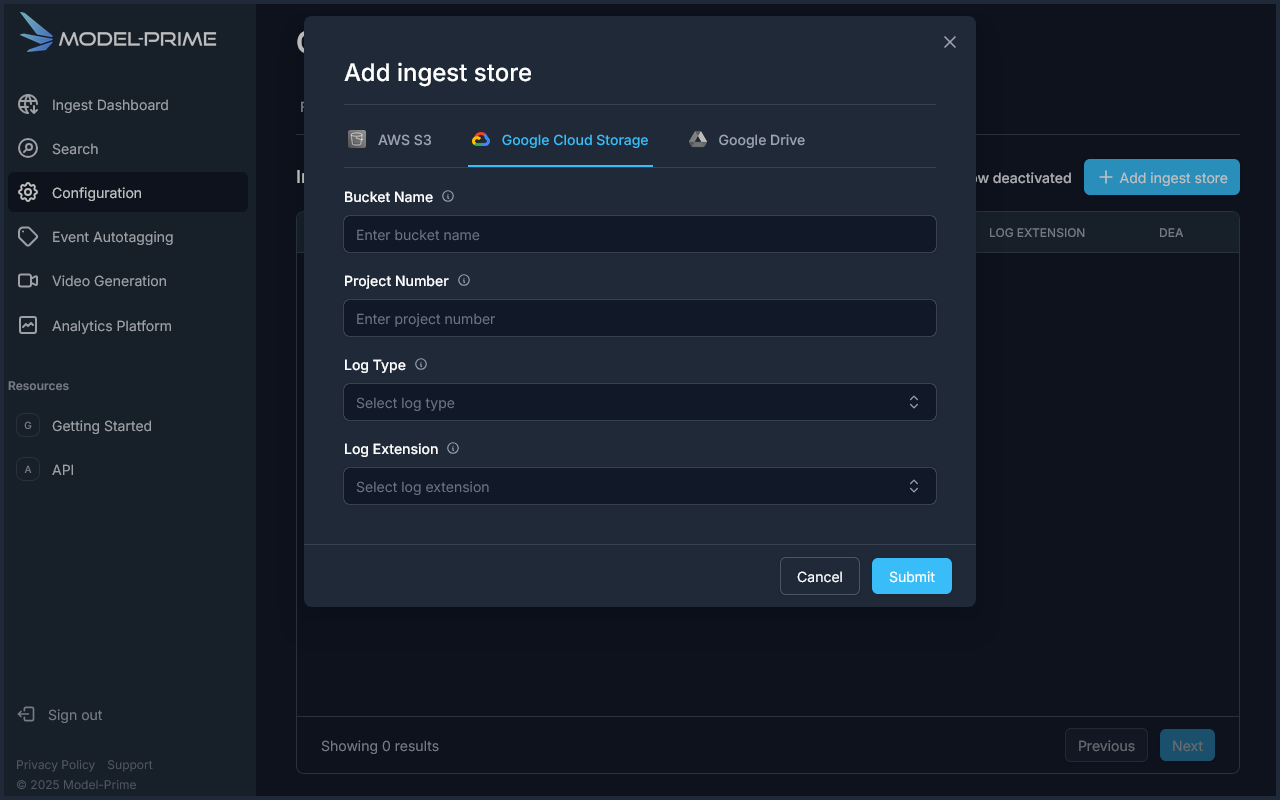
Fill in the required fields:
bucket: the name of your GCS bucket.project_number: the numeric ID of the GCP project which contains the bucket.log_type: the type of log which this bucket contains.log_extension: the extension of the file in which the robolog metadata (ex. ROS 2 .yaml files) or the log itself (ex. ROS 1 .bag files) can be found.
What if I have two log types?
Model-Prime currently supports ingestion of one robolog type per bucket. If you have multiple log types, you must create and register a separate data store for each type. Make sure to regularly check out our changelog for announcements regarding support for multiple log types per bucket.
Step 2: Setting up infrastructure to inform Model-Prime of new robolog uploads
Your organization can set up infrastructure within GCP which allows Model-Prime to be alerted whenever a new robolog is uploaded. By managing the events yourself, you are also able to filter out extraneous events for files which should not be processed by Model-Prime.
In order to do this, we will be using the following GCP resources:
- Google Object Storage: The bucket to store the robologs.
- Eventarc: To receive events from the GCS bucket.
- Workflows: To obtain authentication and inform Model-Prime of the event.
You will also need to create an access token for use with the Model-Prime API.
GCP UI example
We will assume that you have already created a bucket for this and the following examples. The bucket we will use is
named model-prime-ingestion and is Multi-region, located in the Americas. We will also assume that you have created
an access token for use with the Model-Prime API.
Creating a Workflow
Navigate to Workflows within the GCP UI and click + Create. Then fill out the fields, providing a name and description for future reference.
Given that our example bucket is in the Americas, we've set the Workflow's Region to be us-central1. For this example,
we do not care about logging or tracking the Execution History, so those fields have not changed from the default value.

For this example, we will be storing our Model-Prime Access Token in an environment variable within the Workflow.
The key will be MP_TOKEN and the value will be the access token.
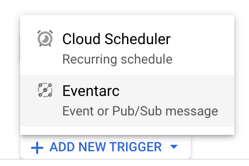
Next, scroll down and click on + Add New Trigger and then select Eventarc as the trigger type.
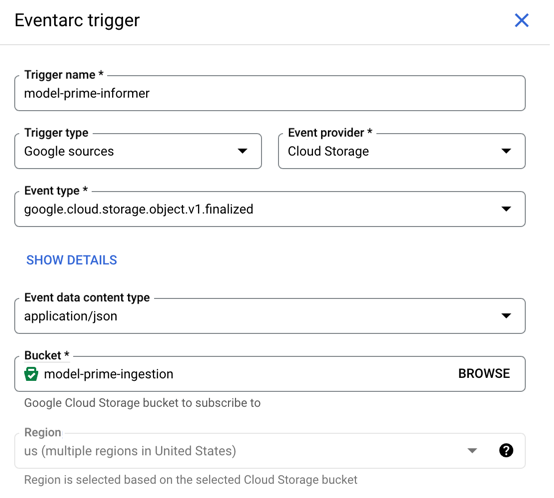
A new popup will appear with a form used to configure the trigger. The important details to note are:
Trigger Type: SelectGoogle sourcessince the event will come from GCS itself.Event Provider: SelectCloud StorageEvent Type: Selectgoogle.cloud.storage.object.v1.finalizedwhich will invoke whenever a new object is createdBucket: Fill in with the name of your GCS bucket
In addition to this, you will want to make sure to have or create a service account which has permission to receive Eventarc events as well as run Workflows. We use the Default compute service account for this example, but that isn't always the best choice because it is better to create a new service account which has the least amount of permissions necessary to run the Workflow.
Note: A Workflow may have multiple triggers, and it may make sense for your organization to also inform Model-Prime about deletion events. In that case, simply add another trigger for the
google.cloud.storage.object.v1.deletedevent type. You may also create a completely separate Workflow for this use-case if you prefer.
Defining the Workflow
You will now be presented with a form which allows you to define the Workflow. With all the previous steps having been performed, you may use the following YAML definition:
main:
    params: [event]
    steps:
      - extract_event:
          assign:
            - bucket: $${event.data.bucket}
            - object_name: $${event.data.name}
            - event_time: $${event.data.timeCreated}

      - call_webhook:
          call: http.post
          args:
            url: "https://api.model-prime.com/api/ingest/v2/trigger"
            body:
              host_config:
                location: "gs://$${bucket}/$${object_name}"
                storage_type: "GoogleCloudStorage"
            headers:
              Content-Type: "application/json"
              Authorization: $${sys.get_env("MP_TOKEN")}
          result: response

      - log_response:
          call: sys.log
          args:
            text: "Webhook response: $${response}"
Once this is done, click the Deploy button, and your Workflow will be created.
Automatic ingest invocation is now set up on your bucket! Please test it by uploading robologs to the bucket. If the configuration of all these components is correct, then you will see ingests begin to process in our web app shortly after your upload completes.